
 Before starting, follow the Step by Step setup for Amazon Web Services. Be sure to follow the Additional Required Steps. If you are using Microsoft Azure follow the Initial configuration steps here.
Summary
This blog outlines how to migrate an on premise Active Directory domain controller to an a cloud Active Directory domain controller using TrueStack Direct Connect.
https://truestack.com/can-you-migrate-your-on-prem-domain-controller-to-the-cloud
Please read through our FAQ The Seamless Migration for tips related to bandwidth, scanners, printers, cloud backup and client/server line of business applications.
Migration Directions:
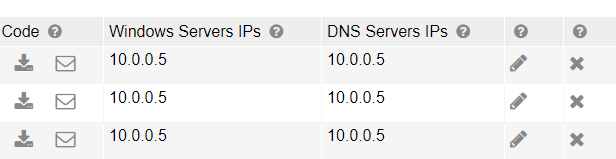
- In the TrueStack Direct Connect interface, create an installer for your on premise Windows Domain Controller. In the Windows IP field, add the Private IP of the cloud Windows server. In AWS find the private IP on the description tab of the instance. In Azure, find the Private IP under Virtual Machines. This will allow the Windows on premise server to have access to the cloud Windows server. In the DNS IP field type in the IP of the on premise Windows Domain Controller. This will direct the VPN to get DNS from the on premise Windows server. It should look similar to this.

- Download and install the installer you just created on the on premise Windows domain controller. This will install on a physical or virtual server.
- After installation verify that the on premise server VPN is connected in the TrueStack Direct Connect interface. If the computer is on and connected the name will appear in blue in the database.
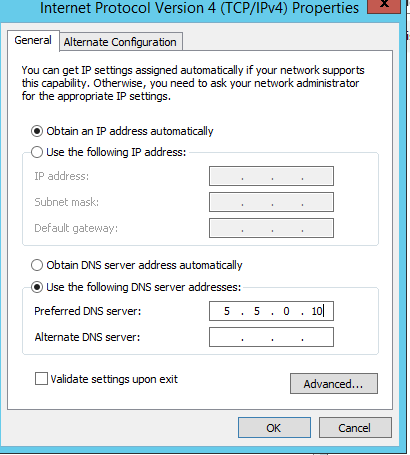
- Find the IP of the TAP adapter on the on premise server. It will look similar to this 5.5.0.10. The easiest way to find the IP of the TAP adapter on the on premise server is to right-click the network adapter in Control Panel, click on Status then Details.
- Add the IP as the Preferred DNS server on the cloud Windows server. This is added to the network adapter of the cloud server. It should look similar to this.

- Add the cloud Windows server to the on premise server’s domain.
- Before promoting the server as a domain controller, open DNS on the on premise server. Ensure the server is listening on all IP addresses and that Zone Transfers are allowed.
- Also ensure that your local administrator password on the cloud Windows server is not the same as the Domain administrator password. If it is, change the local administrator password on the cloud Windows server.
- Promote the cloud Windows server to a domain controller. Be sure to use domain credentials when you promote the server. If you have problems promoting your server to a domain controller see Troubleshoot.
- Now that the cloud server has been prompted as a Windows domain controller, in the TrueStack Direct Connect interface, click on the edit button to the right of the on premise Windows server and change the cloud Windows IP in the DNS Server IP field from the on premise server IP of the TAP adapter to the cloud Windows server IP. On the on premise server, restart the TrueStack windows service to update the change.

- This is a good time to Snapshot the Windows cloud server for additional backup.
- Create an installer in the TrueStack Direct Connect console for each computer that will connect to the cloud Windows server. In the Windows IP field and in the DNS Server IP field add the private IP of the cloud Windows Server. This will be something like 10.0.0.5. This will allow the computers access to this cloud Windows server and it will allow both the server and computers to communicate using DNS. A DNS server IP is also required for group policy and other server rules to communicate with the computers properly.
- Each installer is made for only one computer and will only work on one computer at a time. Each installer contains a unique certificate which is used to create an encrypted VPN tunnel between the computer and the Windows server. To protect the security of your cloud servers ensure that the installer is only installed on the appropriate computer. Also ensure it isn’t compromised or stolen during or after distribution.
- Distribute the individual installers to each user. There are multiple ways to do this.
- You can email or copy the installer link and send it to the computer user along with the security code. The user will need to enter the security code before it times out, in order to download their installer.
- Or you can download the installer yourself by clicking on the Download link by the security code. You can then send it to the user or put it in a local share that the user has access to or copy it to their computer.
- Install or have the user install the software on their computer. For MAC computers follow these directions to connect using Tunnelblick.
- After installation verify that that computers are connected in the console. If the computers are on and connected their names will appear in blue in the database. At this point the computers should still be able to access the on premise server as normal.
- Now migrate your data to the AWS Windows server. You can use robocopy or other migration tools. Don’t share the migrated folders until you’re ready to demote and remove the on premise server from the domain. See below.
- The following change should be planned, probably after hours, because after this change your on premise computers may not be able to access the on premise server. If DHCP for the network, via your router or on premise server, is giving out the DNS IP for the on premise Windows server to the local network adapters of the on premise computers, remove it and use different DNS addresses. Either use DNS server IPs provided by your ISP or public DNS server IPs. The computers get internet DNS lookups through the Local Area network adapter and they get Windows domain lookups through the TAP adapter. The TAP adapter should be receiving the IP address of the cloud Windows server. For your local network we don’t recommend using static IPs on the computers, however if this is your network protocol, change the Primary and/or Secondary DNS server IPs to your Gateway IP or your ISPs DNS server IPs or public DNS server IPs. For laptops that need to be used offsite, we recommend public DNS server IPs like Google’s 8.8.8.8 or 8.8.4.4.
- Transfer the FSMO roles to the cloud Windows Domain Controller.
- Document your shared folder names and printer names if you intend to enable Branch Office printer – see our FAQ on The Seamless Migration.
- Ensure Active Directory has fully replicated to the cloud server.
- Demote the on premise server and fully remove it from the domain. It’s important to delete the on premise server completely from the domain, otherwise the computers may continue to look to the on premise server for Active Directory, Group Policy and DNS lookups. We recommend renaming and restarting it after removing it from the domain so it won’t cause any confusion on the network. Check for remnants of the server in AD and AD sites and services and DNS. Delete the server in all of these places.
- Uninstall TrueStack Direct Connect on the on premise server and delete it from the TrueStack Direct Connect interface.
- Now, you can rename the cloud Windows server so it uses the same name that the on premise server used before it was demoted. This will allow your on premise computers to use cached DNS lookups to access their shares.
- For example, if your on premise server was originally name DCDATA and your cloud Windows DC is named AWSDATA, then after promoting AWSDATA as a domain controller and ensuring Active Directory replication succeeded, then demote DCDATA and remove it from the domain completely. Rename it DCDATAOLD Delete all remnants of DCDATA in Active Directory. Then rename AWSDATA to DCDATA. Set up your network shares and permissions the same way they were on DCDATA. After you migrate the data and configure your shares and permissions your Active Directory users will be able to open their mapped drives and other network shares the same way they did before without noticing that the on premise server is now offline and they are accessing these shares on the cloud Windows server.
- Restart the on premise computers. This will update their adapters and route to them to the cloud Windows server.
Please read through our FAQ The Seamless Migration for tips related to bandwidth, scanners, printers, cloud backup and client/server line of business applications.
Are you migrating your current on premise Windows Domain to the cloud?
Are you migrating your current on premise Windows Domain to the cloud?