
1. TrueStack Overview
The TrueStack Server is a versatile management solution designed to facilitate seamless VPN connections between Windows, Mac, or Linux computers and Windows Active Directory domain controllers or other servers, regardless of location. Additionally, it can be utilized to encrypt all internet traffic from your devices to the TrueStack Server, ensuring secure communication.
Support and Licensing
For support, contact us at [email protected]. Visit our Launch page for links to all platforms and virtual machines (VMs). TrueStack includes 5 free licenses. Additional licenses can be purchased here.
Try it out today. Launch!
Installation and Deployment
The TrueStack Server can be installed in any cloud environment or on-premises. It should be installed on the same network as your Windows Domain Controllers, VMs, or cloud servers. The TrueStack agent can be installed on your computers or deployed through Group Policy.
VPN Authentication and Traffic Routing
The TrueStack Agent authenticates the VPN using individual certificates, eliminating the need for users to remember usernames and passwords. TrueStack can encrypt and route all traffic from the computer through the VPN tunnel to the TrueStack Server or only route traffic destined for the Windows server. The TrueStack agent connects the VPN automatically at startup and operates invisibly to the user.
Management and Customization
Admins can manage each VPN computer connection individually using the TrueStack web interface. TrueStack uses Let’s Encrypt to assign a certificate to the TrueStack interface, and admins can choose custom domain names. Admins can manage connected computers using Windows servers or other cloud servers, route computers from different companies to different servers, and use TrueStack to migrate old Windows servers to new ones, whether on-premises or in the cloud. Admins can also manage server updates and schedule automatic restarts.
Reliability
TrueStack is fast, secure, and reliable.
2. What’s new in TrueStack Server 2.0
Platform:
- The TrueStack server now operates on Noble Numbat 24.04.
- The new TrueStack Agent is based on the OpenVPN 2.6 client.
Security:
- Support for TLS 1.3.
- Utilizes AES 256 GCM block cipher.
- SHA 512 for TLS Crypt.
- Improved performance with Data Channel Offload.
- Incorporates Elliptic Curve Cryptography ED25519 with SHA-512 Digest.
New Features:
- Redesigned admin interface.
- New TrueStack Agent MSI.
- New TrueStack VPN interface accessible via https://localhost:3366.
- Easy VPN restart on computers.
- Group Policy deployment.
- Import computer names from a CSV file for batch connection setup.
- Simplified license addition and upgrades.
- Enhanced logging on the admin tab and computers.
- Schedule automatic updates.
- Option to route all traffic through the VPN tunnel.
- Custom Let’s Encrypt secured URLs for the web interface.
- Ability to add users.
- Restart application or reboot from the Admin tab.
- New cloud servers tab for easy routing of computers to servers.
- Option to route to subnet for computers.
- Improved sorting, searching, and management of multiple computers.
3. Installation
The TrueStack Server includes 5 licenses, allowing you to connect up to 5 computers to the VPN. It can be installed on Ubuntu Noble Numbat 24.04 using the installation script provided below and is compatible with any platform or server supporting this configuration.
Marketplace Availability
The TrueStack Server is available on the following platforms and can be launched directly from their respective marketplaces:
- Microsoft Azure: Launch an instance from the Azure Marketplace. Documentation.
- Amazon Web Services (AWS): Launch an instance from the AWS Marketplace. Documentation.
- Google Cloud Platform (GCP): Launch an instance from the Google Cloud Marketplace. (Coming soon)
- DigitalOcean: Launch an instance from DigitalOcean. (Coming soon)
Install Script:
Run the following script as root on your instance of Noble Numbat 24.04.
$ curl -fsSL https://get.truestack.com/ | bashNetwork
To ensure proper network configuration for the TrueStack Server, the following inbound connections must be allowed:
- Port TCP/22: For SSH, limited to trusted source network(s).
- Port TCP/80: For HTTP from everywhere, required for Let’s Encrypt certificate renewals.
- Port TCP/443: For HTTPS from everywhere.
- Port UDP/7473: For VPN from everywhere.
Platform Support
If the TrueStack Server is not yet available on your preferred platform, please contact us at [email protected], and we will explore adding support for it.
4. Using TrueStack
Adding Computers
On the computers tab it’s easy to add Computers.
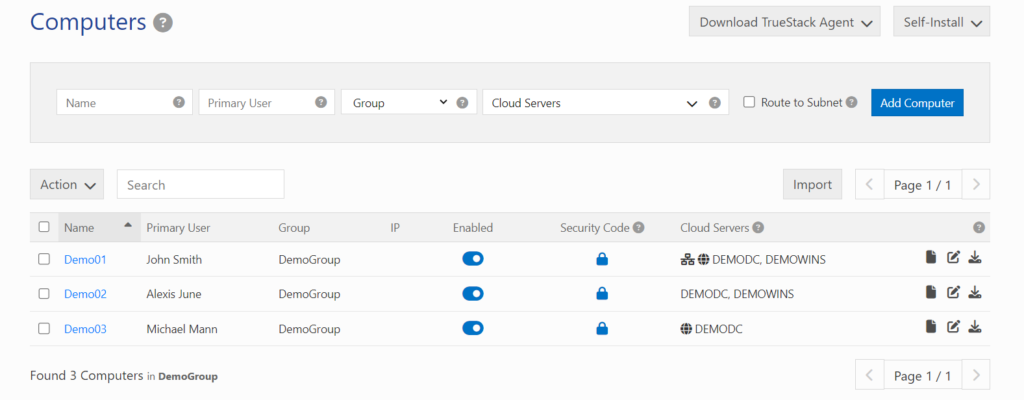
Name: If the computer is connected to an Active Directory domain use the same name the computer has in Active Directory. This will allow the computer to be easily identified on the TrueStack server.
Primary User: We recommend using the name of the end-user who will be using the computer.
Group: You can group your computers for easy sorting. For MSPs who are using TrueStack to manage multiple Windows Domain Controllers we recommend creating groups by customer or company name.
Cloud Servers: Go to the Cloud Servers tab and create a cloud server. If you are routing computers to a Windows Active Directory cloud server, type the name and Local IP address of the Cloud server. This must be an IP address on the same network as the TrueStack server. We recommend isolating the front facing TrueStack server and backend Windows servers using Firewall Security Groups. How you do this will depend on which platform you are using.
- If you want to route one computer to various servers then create multiple servers on the Cloud Servers tab.
- Choose whether the server is a DNS server or WINS server. Active Directory servers should be DNS servers.
- With the DNS box checked the computer will route Active Directory lookups through the DCO adapter to the Windows AD server.
- WINS servers: Some old applications use a WINS Server to map computer names to IP addresses. With the WINS box checked the computer will route WINS lookups to a WINS server. This could be a Windows 2022 or earlier.
- The DNS and WINS servers will show on the TrueStack DCO Adapter.

On the Computers tab you can now choose your Cloud Server(s) from the drop-down menu.
Route to Subnet: This checkbox allows the computer to access all IP addresses in the entire subnet. This subnet is the private subnet your TrueStack server is on. It can be found in Settings / Network / Subnet. For example if you’re subnet is 10.0.1.0/24 then the admin will be able to access all cloud servers in this subnet. This setting will override individual cloud server settings. In general, do not turn this on for end-user computers. We recommend this checkbox only for Admins.
If your computer is a member of a Windows domain you will still need to connect a cloud server that is a domain controller, with the DNS checkbox on so the computer will be able to authenticate to the Windows domain controller.
Route all traffic: This checkbox will route all internet and network traffic through the VPN tunnel. With this checkbox unchecked only traffic destined for the cloud server, such as a Windows Active Directory server, will route through the VPN tunnel.
This is helpful for users who want to hide all their internet and network traffic on local subnets such as public WIFI’s. This will encrypt traffic between the computer and the TrueStack server. A tracert will show that the first hop will be your TrueStack server. Traffic sent beyond the TrueStack server to the internet will not be encrypted. This is true of all VPN services, since VPN only encrypts data between two points.
With Route all traffic turned on, the speed of your internet lookups will vary depending on the speed of your Truestack server, your cloud, your computer and local network. In general our customers rarely see the difference. However this checkbox could cause an increased latency and increase data usage.
For faster DNS lookups you can add public DNS cloud servers like Google’s 8.8.8.8 and 8.8.4.4 to your cloud servers. This will add 8.8.8.8 and 8.8.4.4 to the DCO adapter which you associate the Google DNS cloud servers with a computer.


Setting the DNS server IPs to Google’s DNS server for the DCO adapter isn’t recommended when you have a Windows Active Directory server with DNS installed because in order for the computer to communicate with the AD server all AD DNS lookups need to go to the server and not out to the internet.
If you use the Route all Traffic checkbox with a DNS server, all internet and network traffic DNS lookups, not just Active Directory lookups will go through the VPN tunnel. DNS lookups may be a little slower with this configuration however on standard networks most of our customers don’t experience the slowness.
Installing the TrueStack Agent on a computer
- After you Add your computer you can click on the download button and install the TrueStack Agent on your local computer.
- On a Windows computer the installation will launch a browser to this internet site localhost:3366 upon completion.
- On first connection you will be redirected to a webpage, Localhost:3366 and you will be prompted to enter your TrueStack URL or custom URL and security code.
- The security code is to ensure that the connection is only used on one device. If you try and connect multiple computers using the same security code only one of the computer VPN connections will work at a time.
- You can retrieve the security code in the TrueStack interface by clicking on the lock icon for the computer.

- There’s also an option to send an email the with a link to download the agent in the TrueStack server interface.
Localhost:3366
- In Localhost:3366, once your computer is connected you can see the status of the TrueStack Agent and VPN connections to your TrueStack Server.
- You can restart or reload the connection here. Reload will disconnect and reconnect the tunnel. Restart will restart all the TrueStack agent associated processes.
- You can also see the computer VPN log and changes to the agent on the Config page.
- The TrueStack agent runs as a service. It isn’t visible to the end-user except in services and programs and features or if they navigate to localhost:3366
Making changes to existing computers
- You can click on the computer name to Edit the computer connection and view statistics about the connection.
- Changes made to the computer connection will update to the computer after the TrueStack agent is restarted
- 3 ways to restart the TrueStack Agent
- In the TrueStack server interface, toggle Enabled to off. Wait approximately 30 seconds to a minute and toggle Enabled on. This will force a reload of the TrueStack agent and VPN.

- On the computer that the TrueStack agent is installed on open a browser and go to localhost:3366. There you will have the option to restart the agent.
- Restart the computer
Actions – make changes to multiple computers
The Action drop down menu allows you to choose multiple computers and make bulk changes to those computers, such as disabling, enabling and deleting multiple computers
You can also generate or remove security codes for multiple computers. This is useful if you think security codes have been compromised you can remove all of them and generate new ones as needed.
Install on a MAC
We recommend using the OpenVPN Connect V3. You can download the client here.
After installing OpenVPN Connect V3, download the .ovpn config file for your Mac by clicking on the download icon in the TrueStack server interface. Save the file on your Mac.

Open OpenVPN on the Mac and upload or drag and drop the .ovpn config file to the software. You can also double-click the .opvn file which will launch OpenVPN Connect and you’ll be prompted to import the file and connect.
We recommend changing the Launch option to Restore connection so the VPN will connect automatically.

Install on Linux
The below commands are for Ubuntu, however you can install openvpn on any version of Linux. Some OSs may use yum, rpm or dnf. Consult your OS documentation for installing applications.
$ sudo apt-get install openvpnCreate the Computer in the TrueStack Server interface. Download the .openvpn config file for Linux and upload it to your Linux computer or VM.

Navigate to the folder where you saved the .opvn config file and then run this command. Note that the VPN will connect in the interface but it will not exit to bash. Type ctrl + c to exit to bash. Without the “&” at the end of this command ctrl + c will exit to bash and disconnect the vpn.
$ sudo openvpn --config Demo01.ovpn &To disconnect the vpn:
$ sudo killall openvpnFor a list of openvpn options:
$ openvpn --helpInstallation link
You can copy or email an installation link to an end-user or another IT Admin by copying the installation link under Self-install and opening the URL on the computer that you would like to install the TrueStack agent on.

The user will be prompted for the Security Code of the computer. Retrieve the security code by clicking the lock icon in the TrueStack interface for the computer. Here you can also email the code and the Installation link by clicking on the email icon. This will open your default email application to send the email.
After entering the code the TrueStack agent download page will open.
Security Codes
- After installing the TrueStack agent, localhost:3366 will open in a browser and prompt for the computer’s security code. This is required into order to connect the VPN the first time.
- When using the Self-install installation link, to reach the download page you’ll be prompted for the computer’s security code.
- .opvn config files are specific to the computer. They can be downloaded from the TrueStack server or the download page. If you are installing a config file on a Mac, Linux or other computer using the OpenVPN Connect software you must install the .opvn config file specific to the computer you are trying to connect.
- IMPORTANT: You can only use a security code or .opvn config file on one computer at a time. If you try and connect multiple computers using the same security code or .opvn config file only one of the computer VPN connections will work at a time.
- Use the Action drop down to generate or remove security codes for multiple computers at a time.
Set Security code timeout: In Admin / Settings you can change the security code timeout. But default it’s set to 1 hour. These means that if you send a security code to a user or admin to install on a computer they will only have one hour to install it before the code will expire.
Site Tokens
- Use a Site Token to deploy the TrueStack Agent .msi using Group policy or other software.
- In the TrueStack server Admin / Agent you can generate Site Tokens.
- Choose the length of time before a Site Token expires
- Once the Site Token expires it can no longer be used to deploy the TrueStack Agent
- Use Examine Site Token to see if a Site Token has expired or not.
- Learn more: Deploy the TrueStack Agent with Group Policy
Bulk Import
The TrueStack server allows you to import a list of computers from a .csv file by clicking on the Import button and uploading a .csv file. You can create your own template or download our sample template here.
Before you import computers from the template make sure you’ve created the Group you would like to import the computers to.
The computer Name is the only required field. If the Group is left blank, the computers will show in the TrueStack interface under Show ALL.

Agent Token Timeout
If the TrueStack agent on a computer hasn’t connected for more than 30 days the agent on the computer will no longer be able to connect the VPN. 30 days is the default. You can increase the number of days on the Settings / Miscellaneous / Agent token timeout (days) field.
Users
On the Admin users tab you can add new Admin users. All users have the same permissions on the TrueStack server.
If you ever lose your password, you can reset it from the command line with:$ truestack reset_password username
Updates
Scheduling updates and reboots: It is important to log in to your TrueStack Server on a regular basis and check for updates to any of the packages that make up the system. You can do this in the Admin section manually, or configure Auto Updates in the Settings. You can also configure auto reboots during scheduled maintenance windows. If you don’t think you can manually keep it up to date, please enable Auto Updates and Auto Reboots and configure maintenance windows so that your server always stays up to date and secure.
TrueStack Agent Updates
New released versions of the TrueStack agent will need to either be installed on the computers manually or installed via Group Policy or other deployment software. See group policy deployment.
Managing Licenses
Purchasing Licenses:
- The TrueStack server comes with 5 licenses free.
- For Licensing support email: [email protected]
- You can only activate your license key on one TrueStack server
- Purchase new licenses from our Pricing page.
- Monthly or Yearly license options are available. There is a 10% discount for yearly licenses.
Adding additional licenses:
If you have purchased 10 licenses and you want to add another 10, don’t purchase them from the pricing page. If you purchase a license from the pricing page and apply it to your current TrueStack server it will overwrite the current license.
- Log into your account.
- Choose the license you want to upgrade and click on View Licenses / View Upgrades

- If you have 25 licenses you can upgrade to the next tier which is 50 licenses.
- This will give you an additional 25 licenses and leave your expiration date the same.
- It will pro-rate the additional licenses.
Moving a license to a different TrueStack server
- You can only activate your license key on one TrueStack server.
- To move your license key click on View Licenses / Manage Sites.
- Deactivate Site
- After deactivation you can activate the license key on a different TrueStack server.
5. Network Security
The TrueStack server is a front-end webserver with ports 80,443 and udp 7473 open to anywhere. This is required so the computers can connect to the TrueStack server from any IP. If you are using the TrueStack server to access other servers in your cloud or on-premise we recommend firewalling the other servers so they are back-end servers. In AWS and Azure this is done with Security groups. Each platform or your local network will have different ways to do this.
Create security groups so the TrueStack server and back-end Windows servers can communicate. How to do this is detailed for each platform or for manual installs in #installations or #cloudinstalls.
Firewall Scenarios:
- Multiple Windows servers in same security group: Some Admins may want to put multiple Windows servers in the same security group. For example, if the computers need to have access to Multiple Windows servers in the same domain and these Windows servers need to communicate to each other then put the Windows servers all in the same security group.
- Multiple Windows servers in separate security groups: If you using one TrueStack server to manage multiple different Windows AD domain controllers for different domains, then place each Windows server in a separate security group. This is ideal for MSPs who manage multiple companies that each have separate domain controllers.
- TrueStack VPN only: If you are simply using TrueStack to encrypt all internet traffic from the computer to the Truestack server and you are not routing computers to different Windows servers, instead the computers go directly to the internet from the TrueStack server, then leave TrueStack in it’s own security group.
Route to 5.6.0.0/16
The Windows servers need to be able to access the computers in order to manage them with Active Directory. This requires a route to the 5.6.0.0/16 subnet. Each computer connected to the VPN will receive an IP on this subnet. This route needs to be created on your local network or cloud platform. How to do this is detailed for each platform or for manual installs in #installations or #cloudinstalls.
6. Using the TrueStack server to manage Windows Active Directory computers
The TrueStack server is an excellent tool to use for MSPs and I.T. departments who manage computers with Windows Active Directory servers. The TrueStack vpn makes a connection to the AD server and allows the computers to be mobile and managed from any location. The TrueStack server can be used to migrate your on-premise Windows domain to a an updated Windows domain controller in the cloud. TrueStack supports the TrueStack server only. We don’t offer technical support for local network or cloud network configurations or Windows server configurations. Contact TrueStack support by email at [email protected]
Network Configuration
- Set up the TrueStack server as a front facing web server.
- Put the TrueStack server on the same subnet as your Windows servers.
- You can use NAT or Firewalls to isolate the frontend TrueStack server from the backend AD servers. This will depend on your particular network hardware or VM hosting platform capabilities.
- The TrueStack server needs to have ports TCP 80 and 443 and UDP 7473 open to the internet. The backend AD servers need to be able to be able to access the TrueStack server.
- On the Truestack server network you will need a route from 5.6.0.0/16 to the TrueStack server. This allows access from your AD servers to the AD connected computers. You can verify this is working by pinging the local computers from the Windows server on their 5.6.0.0/16 IP which can be found in the TrueStack server interface by the name of the connected computer. Ping will require that firewall rules are opened on the local Windows firewall of the computers.
Windows domain Scenarios:
Connect computers to a new Windows cloud Active Directory domain controller in the cloud or on-prem.
- Install a Windows server either as a cloud VM or on-prem.
- Install Active Directory on the Windows server and promote it to a domain controller. Here’s a good how-to from Infrosos.
- Set up and install the TrueStack server on the same network. See Network Configuration above and see specific instructions for cloud, such as AWS, Azure, Google etc or manual installations.
- Configure firewall rules to isolate the TrueStack servers as a front-end web server.
- Add the computers in the TrueStack interface. Give the computers access to the Windows server.
- Install the TrueStack agent on the computers.
- Add the computers to the Windows domain. Here’s a good how-to from Wikihow.
- We recommend creating a naming system that will help you identify the physical computers.
Extend the domain with a second domain controller.
- Follow the steps in the first scenario above to install a Windows server and the TrueStack server.
- In the Truestack interface create a computer and a cloud server. The cloud server will be the second Windows server, the one you just installed. The computer will be the primary domain controller, the one that will replicate the domain to the new Windows server.
- In the TrueStack interface give the computer (primary DC) access to the cloud server (new server).
- Install the TrueStack agent on the primary domain controller.
- On the new Windows server set the preferred DNS to the TrueStack IP of the primary DC before adding it to the domain. After it’s been promoted to a domain controller change the preferred DNS back to it’s private IP or 127.0.0.1.

- Add the new Windows server to the domain and then promote it as a domain controller.
- Here’s a good how-to from V2cloud.
Migrate your domain from a Windows on-premise server to a cloud Windows server. Many MSPs often find closet Windows domain controllers that are managing computers on a local network or across multiple networks using site to site VPNs. the TrueStack server is an excellent tool to use to consolidate on-premise Windows servers into one Windows server VM in the cloud that manages all of the computers wherever they are at.
- Follow the steps in the first 2 scenarios to set up a Windows domain controller and extend the domain to the new Windows DC.
- Ensure the new Windows DC has replicated to the domain.
- Migrate all of the FSMO roles to the new Windows domain controller. Here’s a good how-to from Microsoft.
- Install the TrueStack agent on all of the computers and give them permissions to access the new domain controller.
- Change DHCP on the LAN networks so it goes directly out to the internet for DNS on the local area adapter instead of looking for the on-premise domain controller. For example you could change the DNS IPs given out to the local computers to Google’s 8.8.8.8 and 8.8.4.4 or to your ISPs DNS IPs instead of the local Windows DC’s IP(s).
- Ensure that the computer can communicate and authenticate with the new primary domain controller.
- Demote the on-premise domain controllers.
- Remove them completely form the domain and rename them.
- If the computers have been accessing company shares on a file server you can rename the new Windows domain controller to the same name as the old file server name so that the shares will continue to open using the same DNS name.
Troubleshooting domain migration issues:
Most replication and migration issues are related to DNS. Generally if you can ping servers by name from both sides of the tunnel replication, adding additional DCs and migration will work. TrueStack installs a second adapter which gives the Windows server two IPs. Set the primary DNS server to replicate traffic through the IP of the TrueStack adapter instead of through the local adapter. This can be done in DNS settings.
- Be sure Zone Transfers is turned on, on both servers.

Send DNS traffic from the primary DC through the truestack adapter.

You can use the “repadmin” command or Active directory sites and services to see if replication is working correctly. Here’s a How-to from Microsoft.
Deploy the TrueStack Agent with Group Policy.
In order to deploy the TrueStack agent with group policy the computers will need to have direct access to the Windows Active Directory server, meaning they either need to be on the same network as the Windows AD server or be able to access the server through another VPN tunnel.
- Add the TrueStack setting to Group Policy. To add the tsagent options to Group policy, download the tsagent.adm, tsagent.admx and en-US/tsagent.adml files from here. This will download a .zip folder.
- Extract the folder and upload it to your Windows Active Directory server.
- Open your Sysvol policies folder, usually found in \\servername\domainname\Policies\
- Move the entire PolicyDefinitions folder here. This will copy the tsagent.adm, tsagent.admx and en-US\tsagent.adml
- Now open the Group Policy management console and create a new GPO or open a GPO that you already have in place for the computers (not users).
- In the GPO when you expand Computer Configuration/Policies/Administrative Templates, you will see TrueStack/TrueStack agent

- Add a Site Token: Attach the GPO to an OU where the computers are located. You will be remote installing the TrueStack agent to the computers not to the users.
- There are a variety of settings options which you can configure, however to deploy the tsagent you only need two options to be set.
- Server URL: Enable the setting and put in the domain name of your TrueStack server, for example https://mydomain.truestack.net.
- Site Token: Enable the setting. Generate a Site Token from the Admin / Agent page of the TrueStack server console. Set the length of time before the token will expire. Paste the Site Token into the field in the Site Token settings in the GPO.
- Create a network share. Add domain Computers to the Share Permissions and give them full control. Give Everyone Full Control.

- Click on the Security tab of the folder and give Domain Computers full control there also.

- Copy the TrueStack Agent to this folder. You can download the TrueStack Agent from the console.
- Import a list of computers from Active Directory into the TrueStack console.
- In the Active Directory OU where you’re computers are, right-click the OU and choose Export List. This will export a list of the computers names.
- Use the TrueStack Import template to create a CSV file with the computer names and settings. Using the Import button to import the CSV file into the TrueStack console. see Bulk Import.
- Create a Software package. In the GPO you created under Computer Configuration / Policies /Software Settings / Software Installation, create a new package. Locate the tsagent that you downloaded in the shared folder you created. Make sure you add it from a network path, for example, \\servername\sharedfolder\tsagent-1.0.3-amd64.msi
- Chose Deployment method “Assigned”

- Now run command gpupdate /force on the server.
- After the computers get the updated policy they will install the TrueStack Agent on the next restart.
7. Migrate from TrueStack Direct Connect to the TrueStack server 2.0
If you are upgrading from TrueStack Direct Connect 1.0 to the TrueStack server 2.0 you can use Group policy to deploy the new TrueStack agent to the computers. This will create a VPN to the new TrueStack server which will take precedence over the VPN from TrueStack Direct Connect 1.0. Then delete the computer in TrueStack Direct Connect 1.0 to terminate the VPN. To unisntall the TrueStack Direct Connect software you will need to manually uninstall it on the computer, however this may not be required since the VPN has been terminated..
- Install the TrueStack server 2.0 alongside your Windows server(s) and alongside the TrueStack Direct Connect server.
- Be sure to set up networking by opening ports with the route 5.6.0.0/16. This will give you 2 routes. The other one is to 5.5.0.0/20 for the TrueStack Direct Connect server.
- Open ports tcp 80, 443 and udp 7473 to the front-end TrueStack server. See #network and follow the directions for your platform or manual install #installations.
- Follow the directions for deploying the TrueStack agent with Group Policy.
- As the computers come online with the updated TrueStack agent in the TrueStack serve 2.0, delete them from TrueStack Direct Connect.
- In the Group policy Computer Configuration/Policies/Software Settings, ensure that “Uninstall this application when it falls out of the scope of management” is unchecked on the properties of the TrueStack Agent deployment.
- After all the computers migrate to the TrueStack server 2.0, terminate the TrueStack Direct Connect server and remove the Group policy.