
Get 720 Windows server hours free from AWS and get a free 15-day trial from TrueStack
TrueStack Direct Connect is a VPN management server made to connect Windows and Mac computers to Windows domain controllers and files servers in the AWS and Azure clouds. This tutorial will help you set up your own TrueStack Direct Connect instance in your Amazon Web Services account.
1. Set up your AWS Account
If you don’t have an Amazon Web Services account, create a free tier account.
Non-Profits may be eligible for $2000 in yearly AWS credits through Techsoup that can be applied to their account. Apply through Techsoup.org.
2. Launch TrueStack Direct Connect
- Once you have an AWS account, click on this link to open TrueStack Direct Connect on the marketplace and click Continue to Subscribe in the upper right-hand corner. If you haven’t already signed into your account, you’ll be prompted to sign in now.
- Accept the Terms.
- Click Continue to Configuration when it’s available. It may take a few minutes for this button to become available.
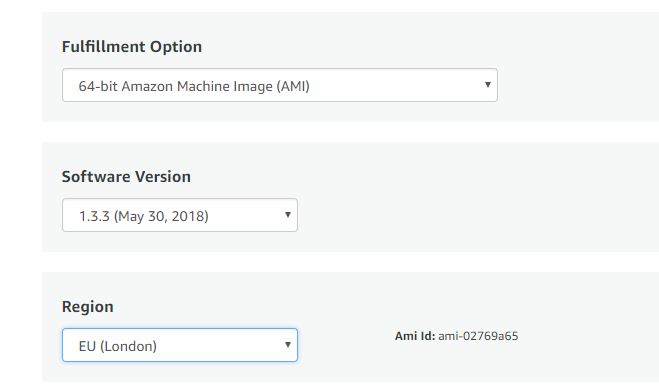
- Leave the Fulfillment Option and Software version as default.
- Choose your region. If you’re new to AWS we suggest choose a region that is closest to your location.
- Click Continue to Launch.
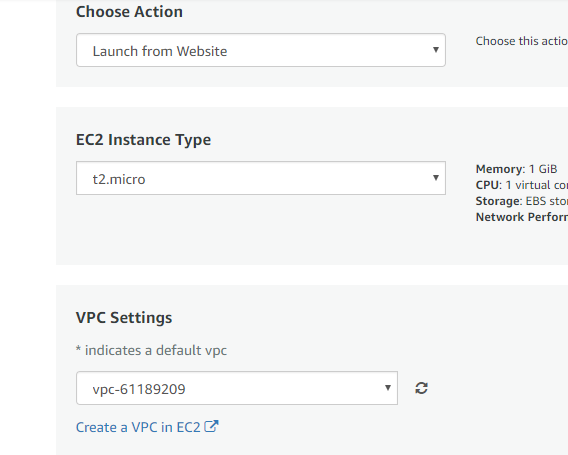
- Choose Action: leave as default – Launch from Website
- EC2 Instance Type: We recommend leaving this as default – t2.micro is sufficient for up to 150 connected devices.
- VPC Settings: leave as default – we recommend using the default VPC. If you don’t have a VPC in your account, click Create a VPC in EC2, then click refresh on this page and your default VPC should appear.
- Subnet Settings: leave as default.
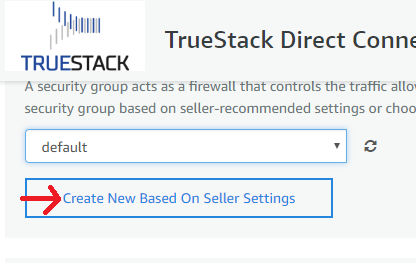
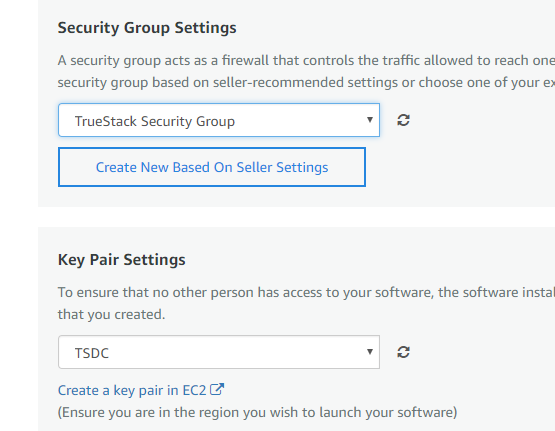
- Security Group Settings: Click on Create New Based on Seller Settings.
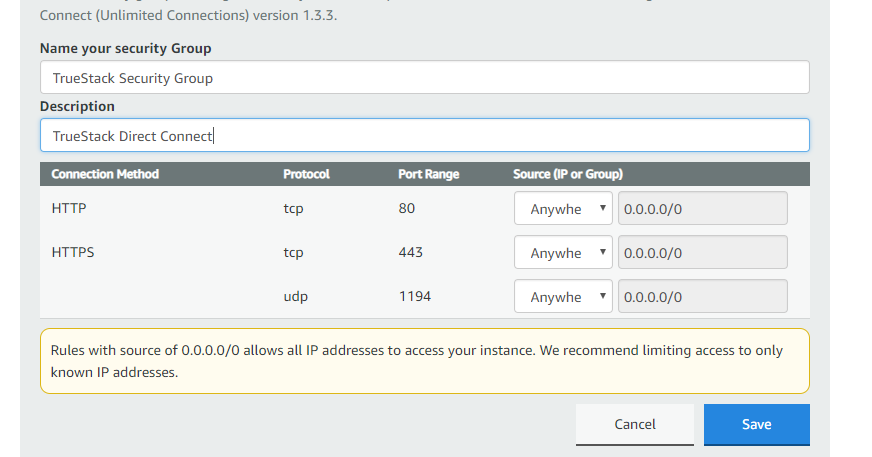
Ports 80, 443 and 1194 are required to be open for TrueStack Direct Connect to work properly. Port 80 redirects to 443 and automatically gives the console a secure certificate for web access. Port 443 is also used for updates. Port 1194 is used for the VPN connection.
- Name your Security Group, for example, TrueStack SG.
- Create a description, for example TrueStack Direct Connect Security Group.
- Click Save.
- Click refresh for the newly created Security Group to appear.
- Key Pair Settings: Create a key pair if you don’t already have one. After creating a key pair, click the refresh button on the Marketplace. The key pair you created should appear in the drop down. Important: Download and save the key pair in a secure location.
- Click Launch.

3. Access the TrueStack Direct Connect Console
- Click on the link on the next page to go to your EC2 Console. Or click here: https://aws.amazon.com. Under My Account, click on AWS Management Console, then under the All Services / Compute section click on EC2. This will bring you to the EC2 Dashboard then click on Running Instances in the middle.
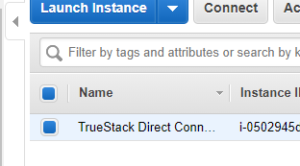
- Your TrueStack Direct Connect instance should appear on the list of running instances. Click the edit button under Name and name it “TrueStack Direct Connect”.
- It should look similar to this:
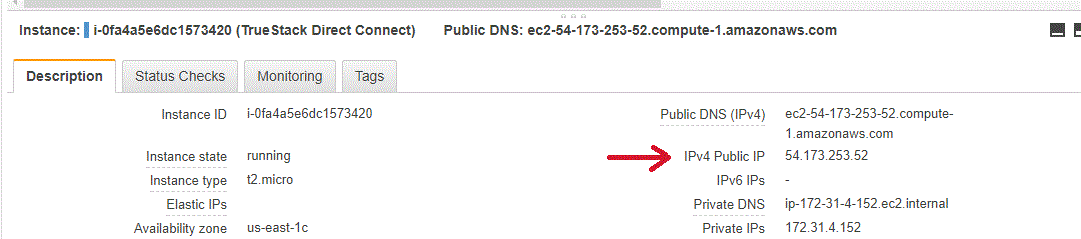
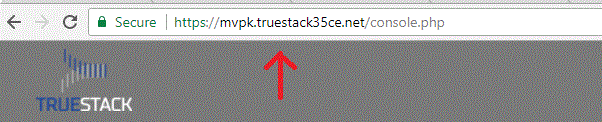
- Find the public IP from the description tab of the EC2 instance. The TrueStack Direct Connect interface works best in Google Chrome.
- Open Chrome and copy the public IP in to the the address bar. The IP should redirect to a TrueStack web address. The redirected URL will look similar to this: https://nk2g.truestack.com. This redirected URL is the address you can use in the future to access your interface.
Troubleshoot: If the IP doesn’t redirect wait a few minutes. Your instance may still be starting up. After waiting, if it still doesn’t redirect to your TrueStack web address, reboot the EC2 instance from your AWS EC2 dashboard. A reboot will take about 3 minutes or less.
-
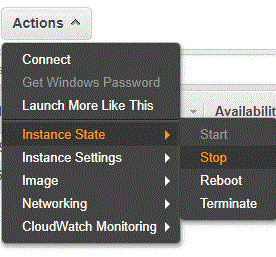
- To Reboot, high-light the Instance and click on the Actions button, then Instant State and Reboot from the drop down menus.
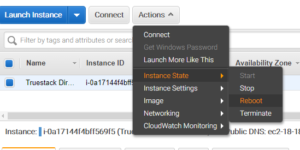
- To Reboot, high-light the Instance and click on the Actions button, then Instant State and Reboot from the drop down menus.
-
- On the TrueStack Direct Connect console acccept the EULA.
- In the AWS EC2 dashboard, find your EC2 Instance ID from the description tab. This is your temporary password. Copy it into the password field in the TrueStack Direct Connect console and login. We recommend that you change this password on the Settings tab after you log in.


4. Additional Required Steps:
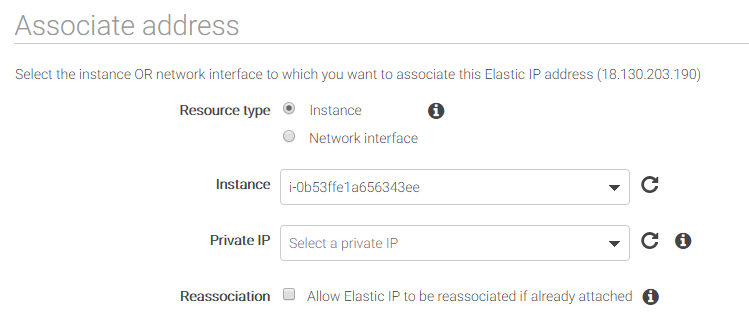
- Add an elastic IP: Without an elastic IP, connected computers may have to clear their DNS cache every time the instance restarts and gets a new Public IP.
- Shutdown the instance before adding an elastic IP. To shutdown the instance, in the Ec2 Dashboard, choose the instance then click on Actions, Instance State, Stop.
- To add an elastic IP, in the EC2 dashboard, click on Elastic IPs under the Network and Security section. Allocate a new IP and then using Actions associate it with your TrueStack Direct Connect Instance. It should look like this.
- Shutdown the instance before adding an elastic IP. To shutdown the instance, in the Ec2 Dashboard, choose the instance then click on Actions, Instance State, Stop.
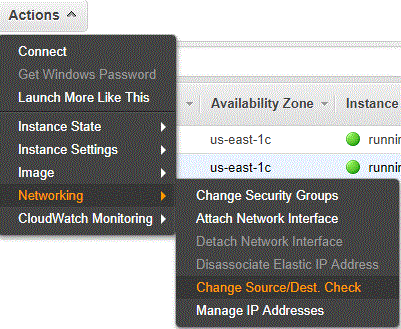
- Disable Change Source/Dest: This is required so your Windows servers will be able to route to the local computers.
- Leave the server shutdown for this step.
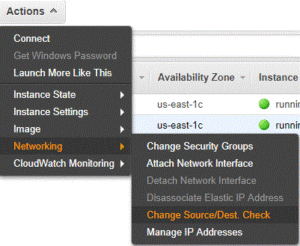
- In the Ec2 Dashboard, choose the TrueStack Direct Connect instance. Click on Actions, Networking, Change Source/Dest. Check. Click Yes, Disable.
- Leave Change Source/Dest. Check Enabled for your Windows servers and Disabled for your TrueStack Direct Connect server.
- Turn the server back on before proceeding.
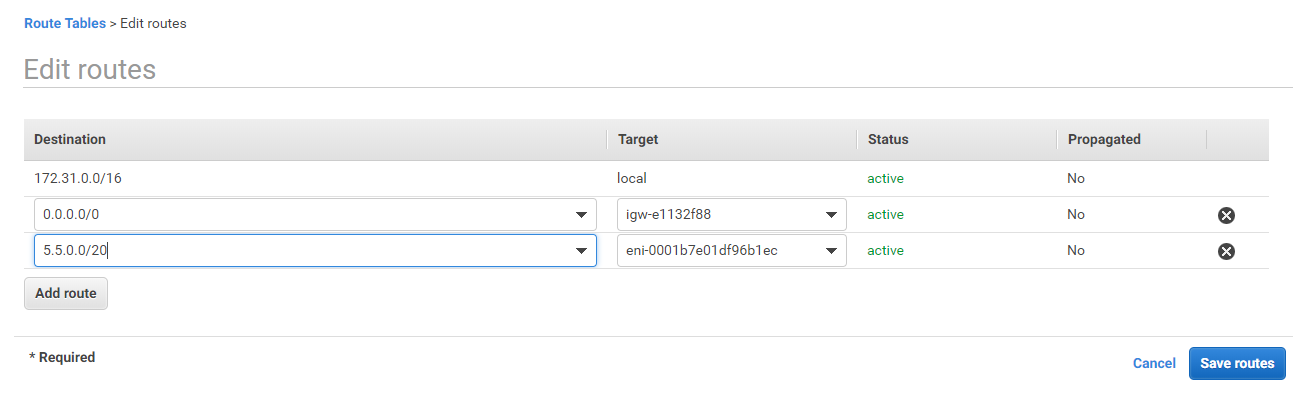
- Add an Additional Route to the VPC: This will allow the Windows domain controller to communicate with the connected computers. Without this route you will not be able to manage AD connected computers with powershell, the command line or group policies.
- On the EC2 Dashboard click on Default VPC on the right side.
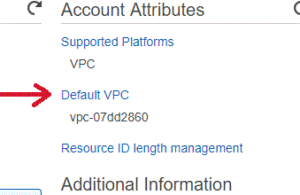
- On the VPC dashboard, click on Your VPCs. We recommend using the default VPC. If you have multiple VPCs, choose the VPC that is associated with the subnet connected to your TrueStack Direct Connect instance.
- Click on the Route Table link associated with the VPC. You may have to scroll down to see the Route Table link. The link will open in a new tab.

- Choose the route table, click on the Routes tab and click Edit.
- Click Add another Route. Do not make any changes to the current routes.
- In the Destination type 5.5.0.0/20
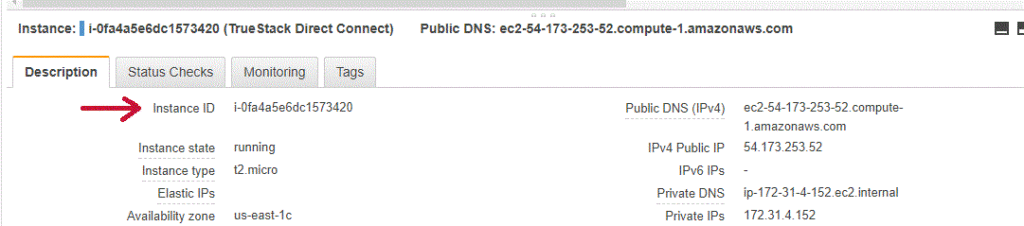
- In the Target drop down, choose Instance, then choose your TrueStack Direct Connect Instance from the list or copy and paste in your instance ID. You can get your instance ID from the description tab for your instance on the EC2 Dashboard.
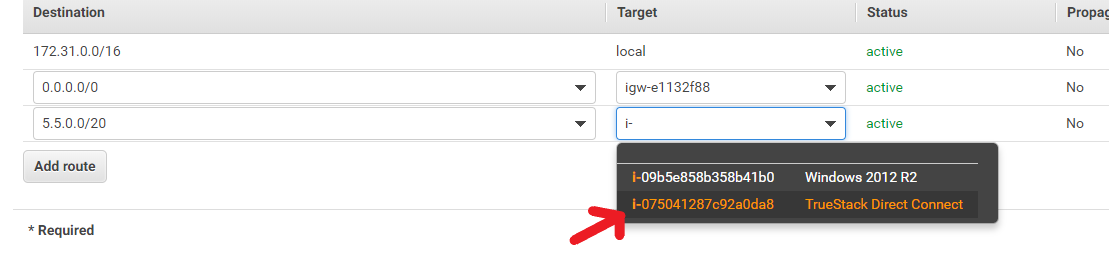
Troubleshooting: if your TrueStack Direct Connect Server Instance ID doesn’t automatically appear in a Target drop down list ensure you are on the route table associated with your default VPC. If you have multiple VPCs ensure your are on the route table associated with the VPC that your TrueStack Direct Connect Instance is associated with. - Click save. You may have to scroll up to find save.
- It should look like this. If your route table shows Black Hole, it’s because the TrueStack Direct Connect server is turned off. Turn it on and it should change to Active.
- On the EC2 Dashboard click on Default VPC on the right side.
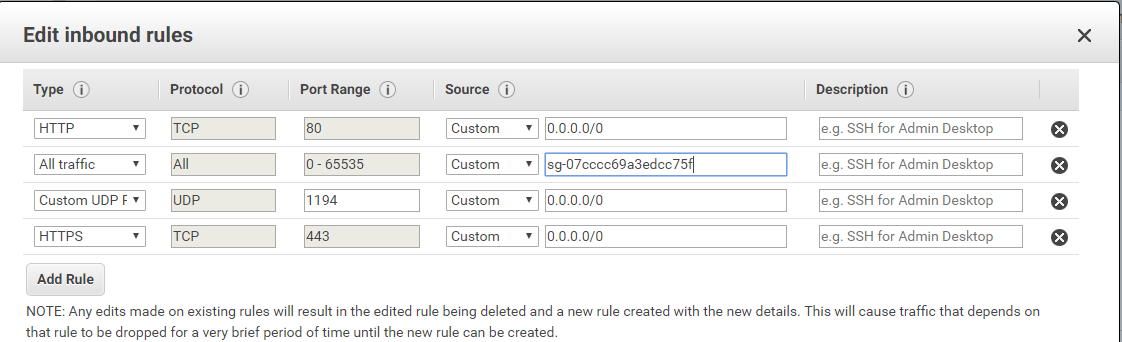
- Add a rule for All Traffic. This is required in order for your Windows servers in AWS to communicate with your TrueStack Direct Connect server. Without this rule your on premise computers will not be able to route to your AWS Windows servers.
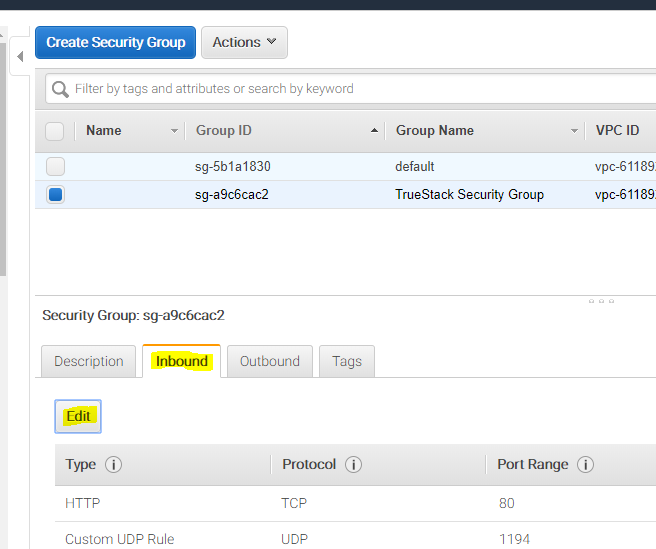
- On the EC2 Dashboard, Under Network and Security, click on Security Groups and choose the TrueStack Direct Connect Security Group.
- Click on the Inbound tab and click Edit.

- Click Add Rule.
- The Type should be All Traffic.
- Set Source to Custom.
- Type in the your security name, for example TrueStack Security Group and choose it from the drop down list.
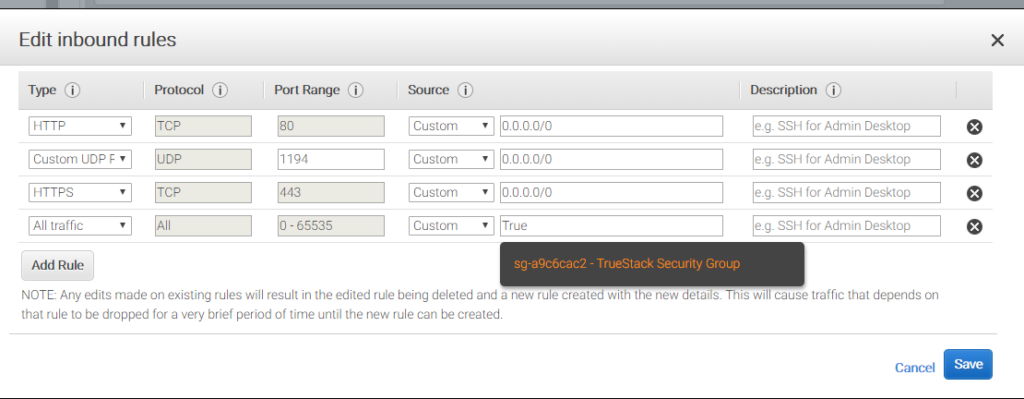
- Click Save. It should look like this.


Recommendations:

- Use the ? help in the TrueStack Direct Connect Console.
- Change the default password after you logon.
- Periodically create backups from the Admin tab.
- Periodically run the updates from the Admin tab. Create a backup before you update the server..
What’s next?
- Practice navigating the Amazon EC2 dashboard, follow our Try it tutorial.
- To take a 48-hour test drive email [email protected] with subject “Test Drive”.
- If you’re considering migrating your on-premise Windows domain controller and file server to AWS read through the Seamless Migration to help you prepare for a successful migration.
- For configuration or migration questions contact TrueStack support at [email protected].