
TrueStack Direct Connect is a VPN management server made to connect Windows and Mac computers to Windows domain controllers and files servers in the AWS and Azure clouds. This tutorial will help you use TrueStack Direct Connect to connect an on premise Windows computer to an AWS Windows Domain Controller.
TrueStack Direct Connect 10 connections is FREE. Follow the directions here to set up your TrueStack Direct Connect server.
Summary:
The following steps will help you set up a Windows domain controller in Amazon Web Services and then connect a Windows Professional computer to the Windows domain using TrueStack Direct Connect. After the computer is a member of Active Directory you can test access to the server by accessing a network share from the computer, pinging the computer from the server and remotely restarting the computer from the server.
Getting Started:
Important: For the purpose of this test we recommend setting up TrueStack Direct Connect and the below Windows server in a region that doesn’t include any production servers so you won’t disrupt any of your current AWS services. We also recommend using the default VPC in that region. Choose a region with a VPC that hasn’t been changed. If you’re setting up a new AWS account then we recommend choosing a region that is closest to your location.
First follow the steps in the Step by Step Setup to configure TrueStack Direct Connect in AWS.
Launch a new Windows Server from AWS:
- Use a Windows Professional computer and use Chrome for your web browser.
- In your AWS account, from the EC2 dashboard, click Launch Instance.
- Scroll down and choose Microsoft Windows Server 2016 Base or Microsoft Windows Server 2012 R2 Base.
- Select the default instance type, t2.micro.
- Select Review and Launch instead of Next: Configure Instance Details.
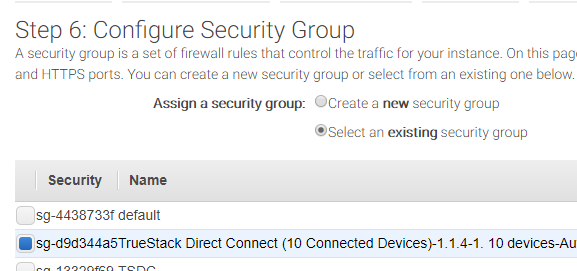
- On the right side click Edit Security Groups.
- Under Assign a Security Group choose Select an existing Security Group and then select the TrueStack Security Group then choose Review and Launch.
Troubleshooting: If the TrueStack Security Group isn’t listed then you probably aren’t in the same region or VPC as your TrueStack Direct Connect Server. Cancel the setup and check your region and VPC. If you haven’t already, follow the Step by Step Setup.
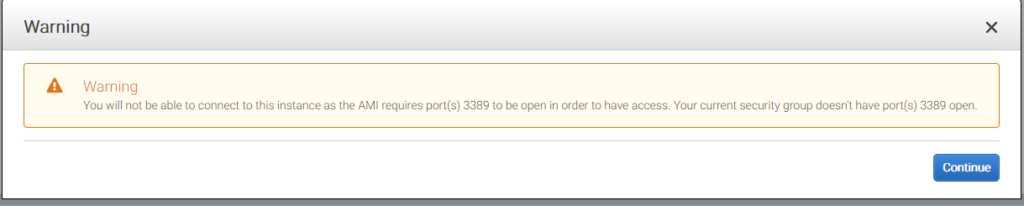
- Click continue to the warning about port 3389. Port 3389 doesn’t need to be open because you will access your Windows server through the TrueStack Direct Connect VPN.
- Click Launch on the next page.
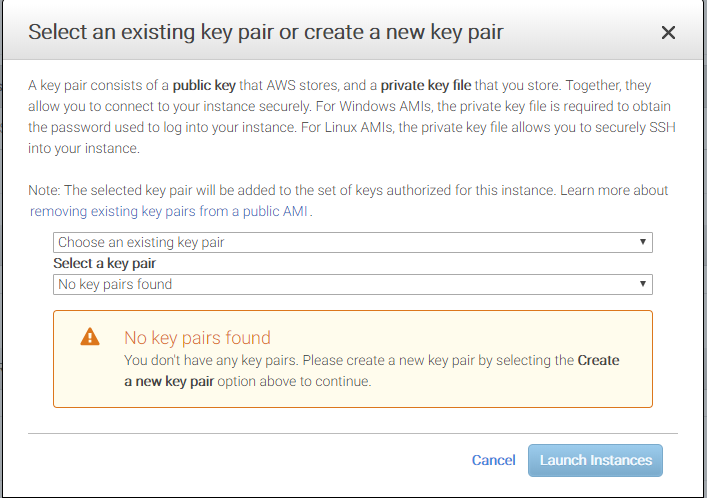
- You will see the below dialog box. If you have an existing key pair choose that, if not create one by clicking on the drop down. Give it a name and download it. Important: Save your key pair it in a secure location.
- Click Launch Instances then click View Instances in the next page.

Connect to the Windows server using TrueStack Direct Connect:
- Open your TrueStack Direct Connect console. Find the private IP of the EC2 Windows server from the description tab of the EC2 instance.
- In the TrueStack Direct Connect Interface, create an installer.
- Give the installer a descriptive name. We recommend using the name of the Windows computer you are connecting from.
- Type the private IP address of the Windows server EC2 instance you just created in both the Windows Server IPs field and the DNS Server IPs field.
- Click Save installer.
- In the security code field for the installer you just created, click on the download button.
- Download and install the TrueStack Direct Connect VPN client on your Windows Professional computer. You’ll be prompted for the security code on install.
- After you’ve installed the client you should be able to use remote desktop to access the Windows server EC2 instance by its private IP. The user is Administrator. You’ll need to get the password for the Windows server from the Connect button of the instance in AWS. You can change the password of the administrator user in Computer Management after you log in.
- Promote the Windows server to a domain controller.
- Add your TrueStack Direct Connected Windows computer to the Windows domain you just created.
Additional Practice:
- Create a shared folder on the Windows domain controller EC2 instance and access the share from your Windows domain connected computer.
- From the Windows domain controller EC2 instance, restart your Windows domain connected computer using this command line: shutdown –r –t 5 –m //yourcomputername –f.